| Dell Optiplex GXa |
SolarisTM 9 x86 9/04 |
Proftpd-1.2.10
必要なソフトウェア:
proftpd-1.2.10.tar.gz (04.Sep.2004 Release)
ftp://ftp.proftpd.org/distrib/source/
ftp://ftp.ayamura.org/pub/proftpd/distrib/source/ (国内ミラー)
準 備:
作業ディレクトリを作成する。
$ mkdir /opt/src/proftpd-1.2.10
作成したディレクトリに移る。
$ cd /opt/src/proftpd-1.2.10
アーカイブをダウンロードする。
$ wget ftp://ftp.ayamura.org/pub/proftpd/distrib/source/proftpd-1.2.10.tar.gz
解凍展開する。
$ tar xozf proftpd-1.2.10.tar.gz
展開されたディレクトリに移動する。
$ cd proftpd-1.2.10
セキュリティ を高めるため、FTPでアクセスされた時の応答メッセージ
(ftpd名とバージョン)を変える。
もしも自分が使っているバージョンにセキュリティホールが見つかってしまっ
た場合、クラッカーはその情報を元に攻撃を仕掛けてくる可能性があるので、
ソースを少々書き換えて、表示させるftpd名とバージョンを架空のFTPDにして
しまう。
includeディレクトリのversion.hをviで開く。
$ vi ./include/version.h
4行目の「#define VERSION"1.2.10"」を以下のように適当に書き換えて保存する。
#define PROFTPD_VERSION_TEXT"3.5.1"
srcディレクトリのmain.cをviで開く。
$ vi ./src/main.c
777行目から783行目までを以下のように適当に書き換えて保存する。
/* ### 変更前 ### */
else if (defer_welcome && *defer_welcome == TRUE)
pr_response_send(R_220, "ProFTPD " PROFTPD_VERSION_TEXT
" Server ready.");
else
pr_response_send(R_220, "ProFTPD " PROFTPD_VERSION_TEXT
" Server (%s) [%s]", server->ServerName,serveraddress);
/* ### 変更後 ### */
else if (defer_welcome && *defer_welcome == TRUE)
pr_response_send(R_220, "domain1.com Orignal FTPD " PROFTPD_VERSION_TEXT
" Server ready.");
else
pr_response_send(R_220, "domain1.com Orignal FTPD " PROFTPD_VERSION_TEXT
" Server (%s) [%s]", server->ServerName,serveraddress);
インストール:
最適化させる。(Solarisの場合、認証にPAMを使用しないようにオプションをつける。こうしな
いとmessagesにエラーが残るようになってしまう。)
$ ./configure --disable-auth-pam
コンパイルする。
$ make
SuperUserになってインストールする。
$ su
password:
# make install
/usr/local/sbin/ に proftpd ftpshut の2つが、
/usr/local/bin/ に ftpcount ftpwho の2つが、
/usr/local/etc/ に proftpd.conf(設定見本)が、
その他、manがインストールされた。
proftpdのシンボリックリンクを/usr/sbin/内に張る。
# ln -s /usr/local/sbin/proftpd /usr/sbin/proftpd
設 定
特にコンパイル・オプションのPREFIXを指定していない場合の設定ファイルは/usr/local/etc/内に格納
される。
viで/usr/local/etc/proftpd.confを開き、以下のように編集する。
=========================================================
# This is a basic ProFTPD configuration file (rename it to
# 'proftpd.conf' for actual use. It establishes a single server
# and a single anonymous login. It assumes that you have a user/group
# "nobody" and "ftp" for normal operation and anon.
# ServerName "ProFTPD Default Installation"
ServerName "ftp.domain.com"
#ServerType standalone
ServerType inetd
DefaultServer on
# "ls" command option
#LsDefaultOptions ""
ListOptions "-a"
# Port 21 is the standard FTP port.
Port 21
# Umask 022 is a good standard umask to prevent new dirs and files
# from being group and world writable.
Umask 022
# To prevent DoS attacks, set the maximum number of child processes
# to 30. If you need to allow more than 30 concurrent connections
# at once, simply increase this value. Note that this ONLY works
# in standalone mode, in inetd mode you should use an inetd server
# that allows you to limit maximum number of processes per service
# (such as xinetd).
MaxInstances 30
# Set the user and group under which the server will run.
User nobody
#Group nogroup
Group nobody
# To cause every FTP user to be "jailed" (chrooted) into their home
# directory, uncomment this line.
#DefaultRoot ~
# ユーザーがftpでログインした場合は、chrootさせ
# DefaultRootをそのユーザーのディレクトリ内に制限し、自分が属する
# グループ "mygroup" に属するユーザーの場合は制限しない設定。(「!」をつける)
# (グループに関わらず全てchrootさせたい場合は、グループの記述は必要ない。)
DefaultRoot ~ !mygroup
# Normally, we want files to be overwriteable.
AllowOverwrite on
# Bar use of SITE CHMOD by default
#<Limit SITE_CHMOD>
# DenyAll
#</Limit>
# Set TimeZone Local
# 一覧表示時の時間表示をサーバーに設定されているLocalTime
# (日本時間)にする。
TimesGMT off
# Set any Time out
# タイムアウトまでの各アイドル時間を指定しておく。
TimeoutNoTransfer 600
TimeoutStalled 600
TimeoutIdle 1200
# Show symboric Links
ShowSymlinks off
# syslog
# syslog proftpdに関するすべてのログをsyslogではない別のファイルに書き出す。
#(この設定をすることによって指定したファイル
#のみに全てのログが書き出される。)これによってログインしてきたユーザー名やクライ
#アントのIPアドレスなどの詳細も記録されるのでセキュリティを考慮して設定すべきであ
#る。
SystemLog /var/log/proftpd.log
WtmpLog off
# A basic anonymous configuration, no upload directories. If you do not
# want anonymous users, simply delete this entire section.
#<Anonymous ~ftp&>
# User ftp
# Group ftp
# We want clients to be able to login with "anonymous" as well as "ftp"
# UserAlias anonymous ftp
# Limit the maximum number of anonymous logins
# MaxClients 10
# We want 'welcome.msg' displayed at login, and '.message' displayed
# in each newly chdired directory.
# DisplayLogin welcome.msg
# DisplayFirstChdir .message
# Limit WRITE everywhere in the anonymous chroot
# <Limit WRITE>
# DenyAll
# </Limit>
#</Anonymous>
=========================================================
/etc/hosts.allow をviで開き、下例を参考に設定する。
# 特定のIPネットワーク(192.168.1.0/24)から許可する場合
proftpd : 192.168.1. : allow
# 特定のIPアドレス(172.16.0.1)から拒否する場合
proftpd : 172.16.0.1 : deny
# DNSで逆引きできないホストからはすべて拒否する場合
proftpd : UNKNOWN : deny
# DNSで正引きと逆引きが一致しないホストからはすべて拒否する場合
proftpd : PARANOID : deny
/etc/inetd.confをviで開き、今までのFTPの部分をコメントアウトし、proftpd用記述を足
す。
#ftp stream tcp nowait root /usr/local/sbin/tcpd in.ftpd -a
ftp stream tcp nowait root /usr/local/sbin/tcpd proftpd
inetdにHungUpを送る。
# pkill -HUP inetd
トラブル 1:
バージョンアップ後、テスト接続しようとすると端末には
「421 Service not available, remote server has closed connection」というエラーが表示
されて接続できなくなってしまい、/var/log/proftpd.log には、
「error: unable to open scoreboard: Bad file number」というエラーが表示されている場合は、
以下の対処で改善する。
$ su
password:
# cd /usr/local/var/proftpd
# rm -f proftpd.scoreboard
# exit
Linuxの場合、proftpd.logには
「error: unable to open scoreboard: No such file or directory」というエラーが表示され
上記と同じ対処で改善した。
トラブル 2:
今回のproftpd-1.2.10にバージョンアップ後、「 FFFTPでログインは出来るものの、サーバー側の
ファイルやディレクトリが一覧表示できない 」とクライアントから質問が来た。
調査したところ、FFFTPはリスト表示させる際にRFCで正式に定義されていない「NLST -R」コマンド
を使用しているが、proftpd-1.2.10からはこのコマンドが使用できないようになっている事が判明した。
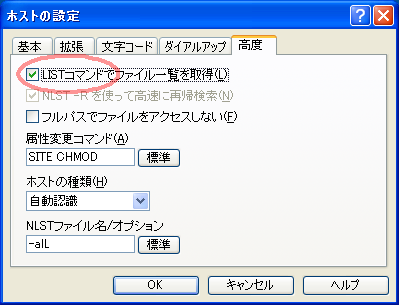
FFFTPのホストの設定で以下のように 「LISTコマンドでファイル一覧を取得」にチェックを入れることで
改善する。